This comprehensive guide explains how super administrators can customize tenant admin menus in Perfex SaaS. There are multiple approaches available, each suited for different scenarios and requirements.
Tenant admin menus can be customized in several ways to provide tailored experiences for your tenants. The available methods range from simple global configurations to advanced package-specific customizations.
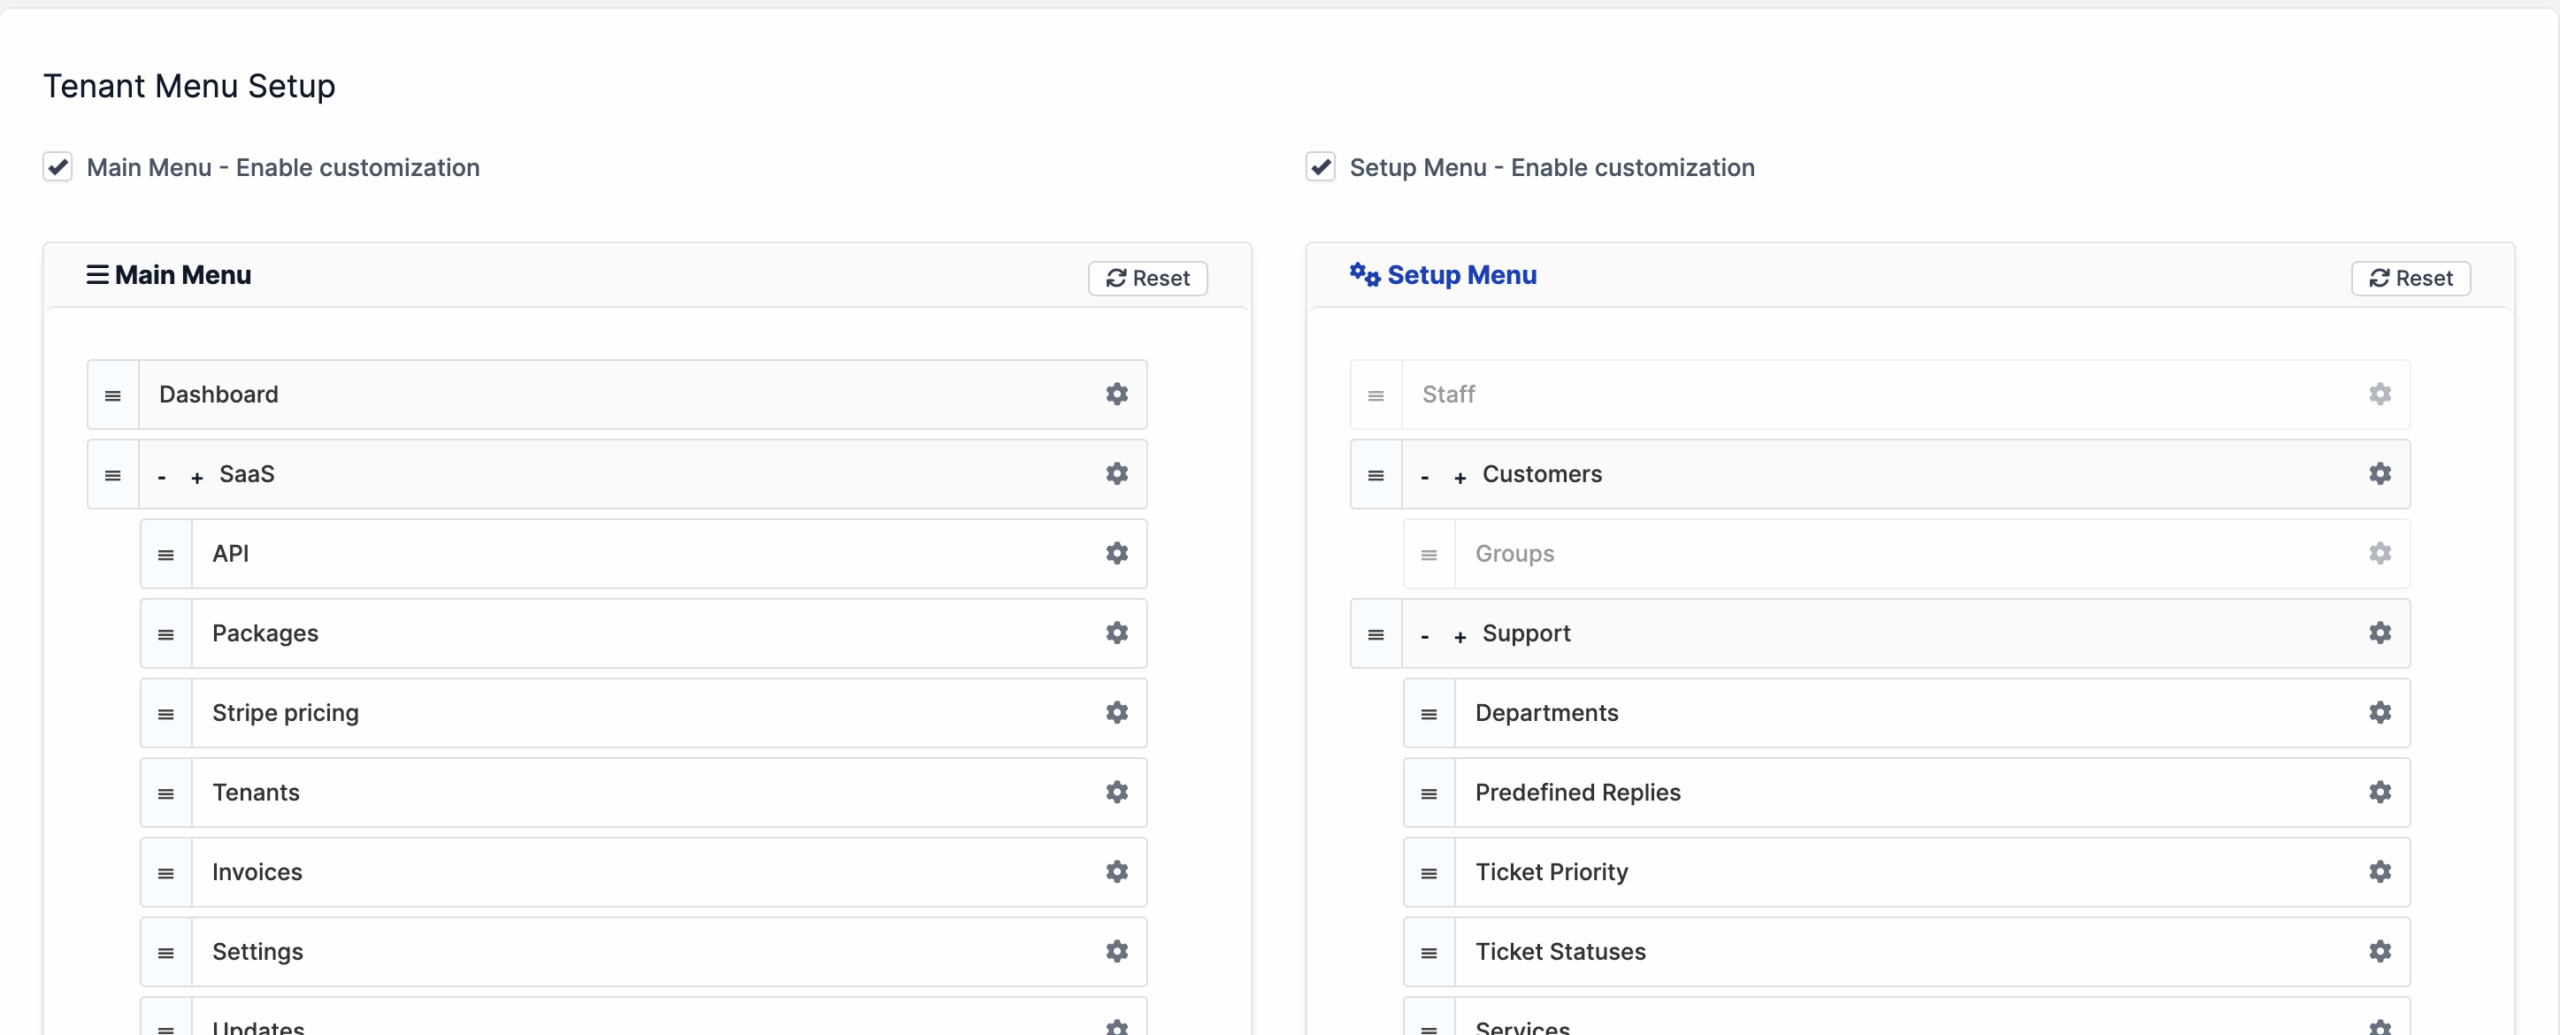
Method 1: Tenant Menu Setup Module (Recommended) #
Available since: v0.3.6
Requirements: Tenant Menu Setup Module
Difficulty: Easy
Real-time updates: Yes
This is the recommended approach for customizing tenant menus as it provides the most flexibility and ease of use.
Step 1: Download and Install the Module #
Download the Module #
- Navigate to SaaS → Updates in your super admin panel
- Locate “Tenant Menu Setup” module
- Download the module
Note: This might require an active support subscription to download the module. If you don’t have active support, kindly renew your support as it assists us in furthering the free extension development or consider other methods below.
Activate the Module #
- Go to Setup → Modules
- Find “Tenant Menu Setup” in the list
- Click Activate
Verify Installation #
- Check that “Tenant Menu Setup” appears in your Setup menu
- The module should now be accessible from the sidebar
Step 2: Global Menu Customization #
Global customization creates default menu settings that apply to all tenants.
Customize Main Menu (Sidebar) #
Navigate to: Setup → Tenant Menu Setup → Main Menu
- Customize Menu Items:
- Reorder: Drag and drop menu items to arrange them
- Disable: Click the gear icon (⚙️) and check “Disabled” to hide items
- Change Icons: Enter FontAwesome class names (e.g.,
fa fa-dashboard) - Sub-menus: Expand parent items to customize child menu items
- Save Configuration:
- Click Save to apply changes
- Changes take effect immediately for all tenants
Customize Setup Menu #
Navigate to: Setup → Tenant Menu Setup → Setup Menu
- Follow the same customization process as the Main Menu
- Important: Some system-critical items might not be available for disabling
- Save and Test:
- Save your configuration
- Visit a tenant instance to confirm changes are applied
Step 3: Package-Level Customization (Advanced) #
Package-level customization allows you to create different menu experiences for different subscription tiers.
Configure Package-Specific Menus #
Navigate to: SaaS → Packages
- Edit Package:
- Select the package you want to customize
- Scroll down to the “Tenant Menu Setup” section
- Enable Customization:
- Check “Main Menu – Enable customization” to override global main menu
- Check “Setup Menu – Enable customization” to override global setup menu
- Customize Package Menus:
- Use the same drag-and-drop interface as global customization
- Configure menu items specific to this package
- Set custom icons and disable irrelevant features
- Save Package:
- Click Save to apply package-specific settings
- All tenants using this package will receive the customized menu
Menu Priority System #
The system follows this priority order:
- Package-specific settings (highest priority)
- Global tenant settings
- System defaults (lowest priority)
Step 4: Verification and Testing #
Test Global Changes #
- Create a test tenant or access an existing one
- Verify that global menu changes are applied
Test Package Changes #
- Access a tenant using a customized package
- Confirm package-specific menu appears correctly
- Verify that package settings override global settings
Important Notes #
Module Assignment #
- You DO NOT need to assign the “Tenant Menu Setup” module to tenants or packages
Real-time Impact #
- Changes made through the Tenant Menu Setup module affect ALL tenants immediately
- Always test changes carefully before applying to production
Troubleshooting Common Issues #
Issue: Menu Changes Not Appearing #
Possible Causes:
- Package-specific settings overriding global settings
- Module not properly activated
💡 Pro Tips #
Combine with Default Menu Setup Module:
- With Tenant Menu Setup active on super admin, you can safely enable the default "Menu Setup" module for tenants without hiding or disabling.
- Tenants will only see and customize within the restrictions you've set
Method 2: Default Menu Setup Module #
Requirements: Menu Setup module assigned to tenants
Difficulty: Moderate
Real-time updates: Limited
Use case: When Tenant Menu Setup module is not available
This method uses the built-in Menu Setup module and works well, but requires more manual configuration. There are two distinct approaches depending on your infrastructure setup.
Overview: Two Configuration Scenarios #
Choose your approach based on your infrastructure:
- Scenario A: Using Master CRM for tenant management
- Scenario B: Using dedicated seeding tenant instances
Scenario A: Using Master CRM for Configuration #
Best for: Simple setups where you manage everything from your main CRM instance
Pros: Centralized management, immediate application to all tenants
Cons: Your admin menu will be affected by tenant configurations
Step 1: Prepare Your Master CRM #
Navigate to: Setup → Modules
- Enable Menu Setup Module:
- Locate “Menu Setup” module
- Click Activate if not already active
Step 2: Assign Module to Tenant Packages #
Navigate to: SaaS → Packages
- Configure Package Modules:
- Edit each relevant package
- In the Modules section, ensure “Menu Setup” is assigned
- This allows tenants to see menu customization options as they appear on yours
Step 3: Configure Shared Settings (Optional) #
Navigate to: SaaS → Packages → [Edit Package] → Advanced Settings
- Add Shared Menu Settings:
- Scroll to “Shared Settings” section
- Add the following keys:
aside_menu_active– for main sidebar menu configurationsetup_menu_active– for setup menu configuration
- These settings will be automatically shared with all tenants using this package

Step 4: Configure Menu in Master CRM #
Navigate to: Setup → Menu Setup
- Configure Main Menu:
- Click “Main Menu”
- Drag and drop to reorder menu items
- Click gear icons to disable items or change icons
- Important: These changes will affect YOUR admin menu too
- Configure Setup Menu:
- Click “Setup Menu”
- Follow same process as main menu
- Some system-critical items cannot be disabled
- Hide Menu Setup from Tenants (Recommended):
- In the Setup Menu configuration screen
- Locate “Menu Setup” in the menu items list
- Click the gear icon (⚙️) next to “Menu Setup”
- Check the “Disabled” checkbox to hide it from tenants
Direct Access URLs (bookmark these): - Main Menu: /menu_setup/main_menu - Setup Menu: /menu_setup/setup_menu - Save Configuration:
- Click Save in each menu section
- Changes apply immediately to existing and new tenants
Step 5: Test and Verify #
Check Your Admin Menu #
- Verify your admin interface still works as expected
- Note that your menu now matches what tenants will see
Test Tenant Instance #
- Create a test tenant or access existing one
- Confirm menu configuration is applied
- Verify shared settings are working if configured
Scenario A: Important Considerations #
⚠️ Critical Warning:
- Your master CRM admin menu will be identical to tenant menus
- Consider this carefully if you need different functionality levels
💡 Pro Tips for Scenario A:
- Consider using this only if you’re comfortable with simplified menus
- Use shared settings to push configurations without affecting your menu
Scenario B: Using Dedicated Seeding Tenant #
Best for: Advanced setups with dedicated seeding infrastructure
Pros: Keeps your master CRM menu unchanged, more flexibility
Cons: Requires separate seeding tenant setup and management
Step 1: Set Up Dedicated Seeding Tenant #
- Create Seeding Tenant:
- Create a dedicated tenant instance for seeding purposes only
- Use a specific package designated for seeding
- Do not use this tenant for actual business operations
- Assign Menu Setup Module to Seeding Package:Navigate to:
SaaS → Packages → [Seeding Package]- In Modules section, assign “Menu Setup” module
- Ensure this package is used only for seeding tenants
Step 2: Configure Menu in Seeding Tenant #
- Login to Seeding Tenant:
- Access your dedicated seeding tenant admin panel
- Use seeding tenant credentials or login as the client
- Configure Menus:Navigate to:
Setup → Menu Setup(in seeding tenant)- Main Menu Configuration:
- Drag and drop to reorder items
- Disable unnecessary features for regular tenants
- Set appropriate icons for tenant experience
- Setup Menu Configuration:
- Hide advanced administrative features
- Keep essential settings accessible as you wish
- Main Menu Configuration:
- Hide Menu Setup from Tenants (Recommended):
- In the Setup Menu configuration screen of your seeding tenant
- Locate “Menu Setup” in the menu items list
- Click the gear icon (⚙️) next to “Menu Setup”
- Check the “Disabled” checkbox to hide it from tenants
Direct Access URLs (bookmark these): - Main Menu: /menu_setup/main_menu - Setup Menu: /menu_setup/setup_menu - Save Seeding Configuration:
- Save both main menu and setup menu configurations
- These become the “template” for future tenants
Step 3: Create Production Tenants #
With the seeding tenant configured, you can now create production tenants that will automatically inherit the menu setup.
Note: Unlike Scenario A, Scenario B does not require manual shared settings configuration. The menu inheritance happens automatically during the seeding process.
- Tenant Creation Process:
- Create new tenants using your seeding tenant as the base
- Menu configuration will be automatically inherited
- Each new tenant gets the same menu setup as configured in seeding tenant
- Verify Inheritance:
- Login to newly created tenant
- Confirm menu matches seeding tenant configuration
- Test that functionality works as expected
Step 4: Advanced Configuration (Optional) #
For Package-Specific Menu Control #
If you need different menu configurations for different packages, you can optionally add shared settings:
Navigate to: SaaS → Packages → [Edit Package] → Advanced Settings
- Add Optional Shared Settings:
- Add
aside_menu_activekey to override seeding tenant’s main menu - Add
setup_menu_activekey to override seeding tenant’s setup menu - This allows package-level customization beyond the seeding template
- Add
Best Practice: Use this only when you need package-specific overrides. For most cases, the automatic seeding inheritance is sufficient.
Step 5: Manage Different Menu Configurations #
For Multiple Tenant Types:
- Create Multiple Seeding Tenants:
Seeding Setup Examples: - Basic Seeding Tenant (limited features) - Pro Seeding Tenant (more features) - Enterprise Seeding Tenant (full features) - Package-Specific Configuration:
- Assign different seeding configurations to different packages
- Use shared settings to enforce specific menu layouts
- Create templates for each subscription tier
Comparison: Scenario A vs Scenario B #
| Aspect | Scenario A (Master CRM) | Scenario B (Seeding Tenant) |
|---|---|---|
| Setup Complexity | Simple | Complex |
| Master CRM Impact | Menu affected | Menu unchanged |
| Flexibility | Limited | High |
| Multiple Configurations | Difficult | Easy |
| Maintenance | Low | Moderate |
| Rollback Capability | Limited | Good |
| Testing Isolation | No | Yes |
Method 2: Best Practices #
1. Choose the Right Scenario #
Use Scenario A when:
- You have simple menu requirements
- All tenants need similar functionality
- You don’t mind your admin menu matching tenant menus
- You want minimal setup complexity
Use Scenario B when:
- You need different menu configurations for different packages
- You want to keep your master CRM unchanged
- You have complex tenant requirements
- You need testing isolation
2. Gradual Implementation #
- Start Small: Configure one package first
- Test Thoroughly: Verify functionality with test tenants
- Monitor Impact: Watch for support tickets or user confusion
- Scale Gradually: Apply to more packages incrementally
Method 2: Troubleshooting #
Issue: Seeding Tenant Configuration Not Inherited #
Symptoms: New tenants don’t get seeding tenant menu setup
Solutions:
- Verify Seeding Process:
- Confirm seeding tenant/package has Menu Setup module active
- Check that you have shared and enforce the necessary option in package shared settings as described previously
Issue: Master CRM Menu Conflicts (Scenario A) #
Symptoms: Master CRM becomes difficult to use after menu changes
Solutions:
- Create Admin-Specific Menu:
- Use direct URLs for hidden menu items
- Bookmark essential administrative functions
- Consider switching to Scenario B
- Backup and Restore:
- Restore original menu configuration
- Implement Scenario B instead
Issue: Can’t Access Menu Setup After Hiding #
Symptoms: Menu Setup module is hidden and you need to make changes
Solutions:
- Use Direct URLs:
Access these URLs directly in your browser:- Main Menu: yourtenantdomain.com/admin/menu_setup/main_menu- Setup Menu: yourtenantdomain.com/admin/menu_setup/setup_menu
Update Considerations #
- Perfex Updates: Major Perfex CRM updates may introduce new menu items that need configuration
- New Third Party Modules and Features: Regularly review and configure new features added to your platform. When new modules are added, you may have to review the menu customization to include the new menu items.
Conclusion #
The Tenant Menu Setup module provides powerful, flexible menu customization capabilities for your SaaS platform. By following this guide and implementing best practices, you can create tailored experiences for your tenants while maintaining control over their admin interface functionality.


